Simple Vegan Cookie Recipe: Uber Sweet Chocolate + Oats
This simple vegan cookie recipe is going to be your new favourite. These PERFECT cookies are one of the SWEETEST ones I’ve made, and just one is enough to make your sweet tooth hurt (I did accidentally spill two cups of sugar into the pot). I had to brush my teeth multiple times after I finished the whole batch ate one. Or two. Or more. Pssh, it’s not like anyone in my family cares for chocolate anyways…if you didn’t have your bowl of oatmeal this morning, this is what you want to make! You can even use monkfruit sweetener instead of the cane sugar to make it healthier, or experiment with another natural sweetener, such as date paste. Then this would be all-natural, no refined sugar!
For this recipe, I got the inspiration from a similar vegan cookies I had made in the past. I had minimal ingredients on hand and wanted something sweet, but not those “mash a banana and mix it with oats” bland breakfast cookie, nor a random funfetti mug cake, classic chocolate chip cookies or even one of those vegan peanut butter cookies with just “three-ingredients and one bowl” either. I wanted chewy cookies, rich in MAINLY chocolate, requiring the least amount of hassle and using all pantry staples. Now this is it!
Bulk Barn Runs
Now all throughout childhood, I was the “decadent desserts” kid. By this, I mean that literally any food item I enjoyed eating had to be thoroughly sweetened to the max. Like, top with brownies, ice cream, drizzle with caramel sauce and a cherry on top (with extra whipped cream) sort of sweet! So I had this ritual of rerouting my mom to bring me to the Bulk Barn, a Canadian all-things-in-bulk grocery store. This was a place where you could take as little or as much as you liked of any ingredients, and they had it all. It ranged from uncooked wild rice to dark chocolate baking wafers to oddly-shaped piping tips, baking trays the shape of Santa Claus’ head and Halloween-coloured sour gummy worms. This was heaven on earth for my younger self (it still gets me extra excited to go here).
Inner Cookie Monster
So I would run into the Bulk Barn, basket in hand and start throwing all types of sugary baking ingredients in. Peanut Butter M&Ms? Check. Chocolate chips, but make them semisweet? Check. Drippy peanut butter? Check. I’ll have to note here that they also sold nut butters in huge containers, so you could take just a bit if you wanted to. The peanut butter also was because I would be making a sweet treat – more specifically, Monster Cookies, a compilation of everything cookie add-in ever, complete with and oats and peanut butter base.
Anyhow, I would grab all this stuff, run home and start making the cookie dough. Butter, oats, vanilla extract, peanut butter, all purpose flour (whole wheat flour was not in my dictionary) in the base. Pretzels, semisweet chocolate chips, M&Ms (oh how I loved my M&Ms), marshmallows, white chocolate and on and on. Once I couldn’t fit any more add-ins, I would watch Glee and devour this cookie dough. Some of the best things in life are just sitting on the couch with your favourite food after a long day to unwind, no?
Digging Myself Out of a Sugary Hole
Yes, you did hear that correctly. I didn’t even bake it. That’s how obsessed I was with sugar (specifically, cookie dough and all things chocolate and/or brownie). I also recall that Costco used to (or maybe still does) sell this Ghirardelli’s triple chocolate brownie mix. OH, this brownie mix was the BEST! It was triple the amount of chocolate coated in a thick brownie batter. I would simply open the pack, mix it with water and eat it raw! Terrible, I know. But also … oh so good. Call it a guilty pleasure, if you will.
You may be wondering where my parents were this entire time. How could they let me get away with such a sugary abomination? How could they feed this sugar craving? Oh yes, they were right there along with me, scolding me for stuffing my face with god knows what. After some time, I learned my lesson (aching joints if you down yourself in sugar anyone?) But at the time, I was trying to eat vegan, so after some time, the brownie mix, the M&Ms, and some other favourites became a no-go (they contained milk). Instead, I learned to replace them with healthy alternatives, like almond flour or a gluten free flour blend for the all purpose flour (or sometimes vegan “junk food” mixes instead).
So you can see why this ULTRA sweet cookie is something I really, really enjoyed. I hope you will too!
Veganizing Cookies
When it comes to vegan recipes, there has been an exponential explode in the last five years with the amount of vegan options available. Vegan chicken strips, cream cheese, feta cheese, salmon, milk, ie cream and everything under the sun! When I began vegan-izing baked goods back in 2014, I didn’t have many options. There was an egg replacements powder that would be available at the local grocery store, but since that year it seems to have been discontinued.
At that point, I vegan making my own “egg.” A combination of either flax meal or chia meal, mixed with three times the amount of water. To be exact, one tablespoon to three tablespoons was the ratio. Let it sit for ten minutes, and you have yourself a flax egg or chia egg! This works best in cookies, muffins, cakes and brownies. I don’t recommend it for macarons, meringue, ice cream or the likes. The egg is not acting as a binder in those cases so it will do something completely different (I had to learn this the hard way).
The milk in cookie recipes is also easily replaced by a non-dairy option. Back in 2014, the only option was soy milk, and Almond Breeze was a company that made almond milk. For butter, I always went to coconut oil, even though oil made baked cookies crispier than butter would, it did the trick back then. Now though, you can buy vegan butter that acts just like the real thing! Needless to say, veganizing a cookie is much easier in 2022 than it ever used to be. That’s why with this recipe, the coconut oil acts as a binder to hold everything together – almost like a large bowl of oats, but in raw cookie form?
Why You’ll Love This Simple Vegan Cookie Recipe
- Chocolate Lovers: This recipe is rich in cocoa powder, making it have a deep chocolate flavour. Since there are minimal ingredients, the chocolate combined with the sugar makes for an amazing cocoa taste!
- Refined-Sugar Free: So I used cane sugar here, but you can use monkfruit sweetener for a “refined sugar free” option. It’s quite easy to experiment here, since this vegan recipe for no bake cookies is not as easy to mess up as a cookie that goes in the oven. If you’re more of a xylitol or erythritol fan, perhaps try these too. Erythritol is way sweeter than regular sugar as per my experience, so use with caution.
- Breakfast Oats: If you love to add toppings into your morning oatmeal, this is just the cookie for you. I used to add cocoa powder and sweetener into my oats, but now these ingredients are just added to a cookie instead! I love how easy it is to eat a handful of oats with this recipe.
- No Bake Delicious Cookies: This recipe is no bake, so you only have to melt together the ingredients on the stovetop and refrigerate it. Can I mention again that these are delicious?!
- Pantry Staples: These ingredients are mostly pantry/baking staples, or easy to find in most large grocery stores. Hopefully no driving out to special locations to find unique ingredients!
Substitutions: Sugar
Here are the main ingredients in this recipe as well as their substitutions. However, I haven’t tried these substitutions so I can’t vouch for them, but leave a comment below if a substitute works for you! Any substitute will change the texture and flavour of the recipe to an extent, so try at your own risk.
Cane Sugar: The sugar melts in the pan and then hardens again to hold the cookies together. If you are looking for a refined sugar-free option, try using monkfruit sweetener. Start with 1.5 cups, then increase to two cups after testing the sweetness levels. You might be able to get away with adding less than two cups of sweetener, if you prefer it to be less sweet. This cookie is VERY sugary!
Other options: If you opt to try xylitol instead (actually one of my favourite 1:1 sugar replacements, for its kind-of close taste and texture to sugar), then you can probably go right for the two cups. For those using erythritol, it tastes a lot sweeter than cane sugar, so use sparingly. You might not be able to add enough to hold the cookies together because it gets too sweet! Yet another option could be to use coconut sugar, which is less sweet per tablespoon than these other sweeteners. I don’t recommend liquid sweeteners such as pure maple syrup though, because they won’t harden the same way sugar crystals will when they are refrigerated.
Lastly, you can use all white sugar, and brown sugar probably works just as well. Although these options are not as healthy, they should still work!
Substitutions: Coconut Oil
Coconut Oil: Make sure you do not substitute this with another oil! Coconut oil hardens in a way that other oils do not. Also make sure that you are using refined coconut oil. The container should not say virgin or extra-virgin! To check, you can smell the oil. if it smells like coconut, it’s not the one!
Refined coconut oil is more refined (as you may have guessed), than a virgin or extra-virgin oil. However, for dessert purposes it works great, especially in no-bake recipes! It doesn’t impart a coconut flavour, and it hardens very quickly once kept in cold conditions. The other option is to use a stick to vegan butter – this can harden and act in the same way coconut oil would! Normally, at room temperature the coconut oil will stay melted anyways, so you don’t have to check for extra oil clumps. Unless it’s cold outside, keeping it at room temperature will just harden it. In this case, make sure you don’t have tiny clumps of oil left when you whisk everything together.
Substitutions: Other Ingredients
Cocoa Powder: Chocolate lovers, you don’t want to skimp out on the cocoa. I recommend to use cacao powder, which is an unprocessed version of cocoa. I used dutch-processed cocoa powder, which has a more earthy flavour, but you can also use regular cocoa.
Oats: I recommend to use rolled oats, because the large flakes hold well in this recipe. If you use small flaked quick cooking oats, it should be fine but you might need some more oats to get it all to hold together. Do not use steel-cut though, the texture is completely different! Also, don’t use oat flour or another type of flour to substitute this grain.
Oat Milk: When it comes to non-dairy milk, oat milk is my favourite. For the texture (I used Silk brand), but also for the neutral flavour. I noticed that the price of oat milk has decreased to that of cashew milk, which is now on-par with almond milk. Other types of non-dairy milks, such as pea milk, are still very pricey though. You might be able to get away with use a can of coconut milk, but it will definitely impart a coconutty flavour if that’s what you’re into.
Notes
- Make sure that all the ingredients in the pan are thoroughly mixed together without any clumps in the cocoa powder! You can even sift in the powder beforehand to make sure no lumps remain.
- If you prefer to have the cookies more salted, sprinkle a tiny bit of sea salt on top of each cookie.
- Make sure to consistently stir the mixture in the pan or it will stick to the bottom and the sugar will burn.
- I usually store these in an airtight container in the freezer because I like the added crunch of keeping them frozen! Ever tried a frozen chocolate bar? It’s like that!
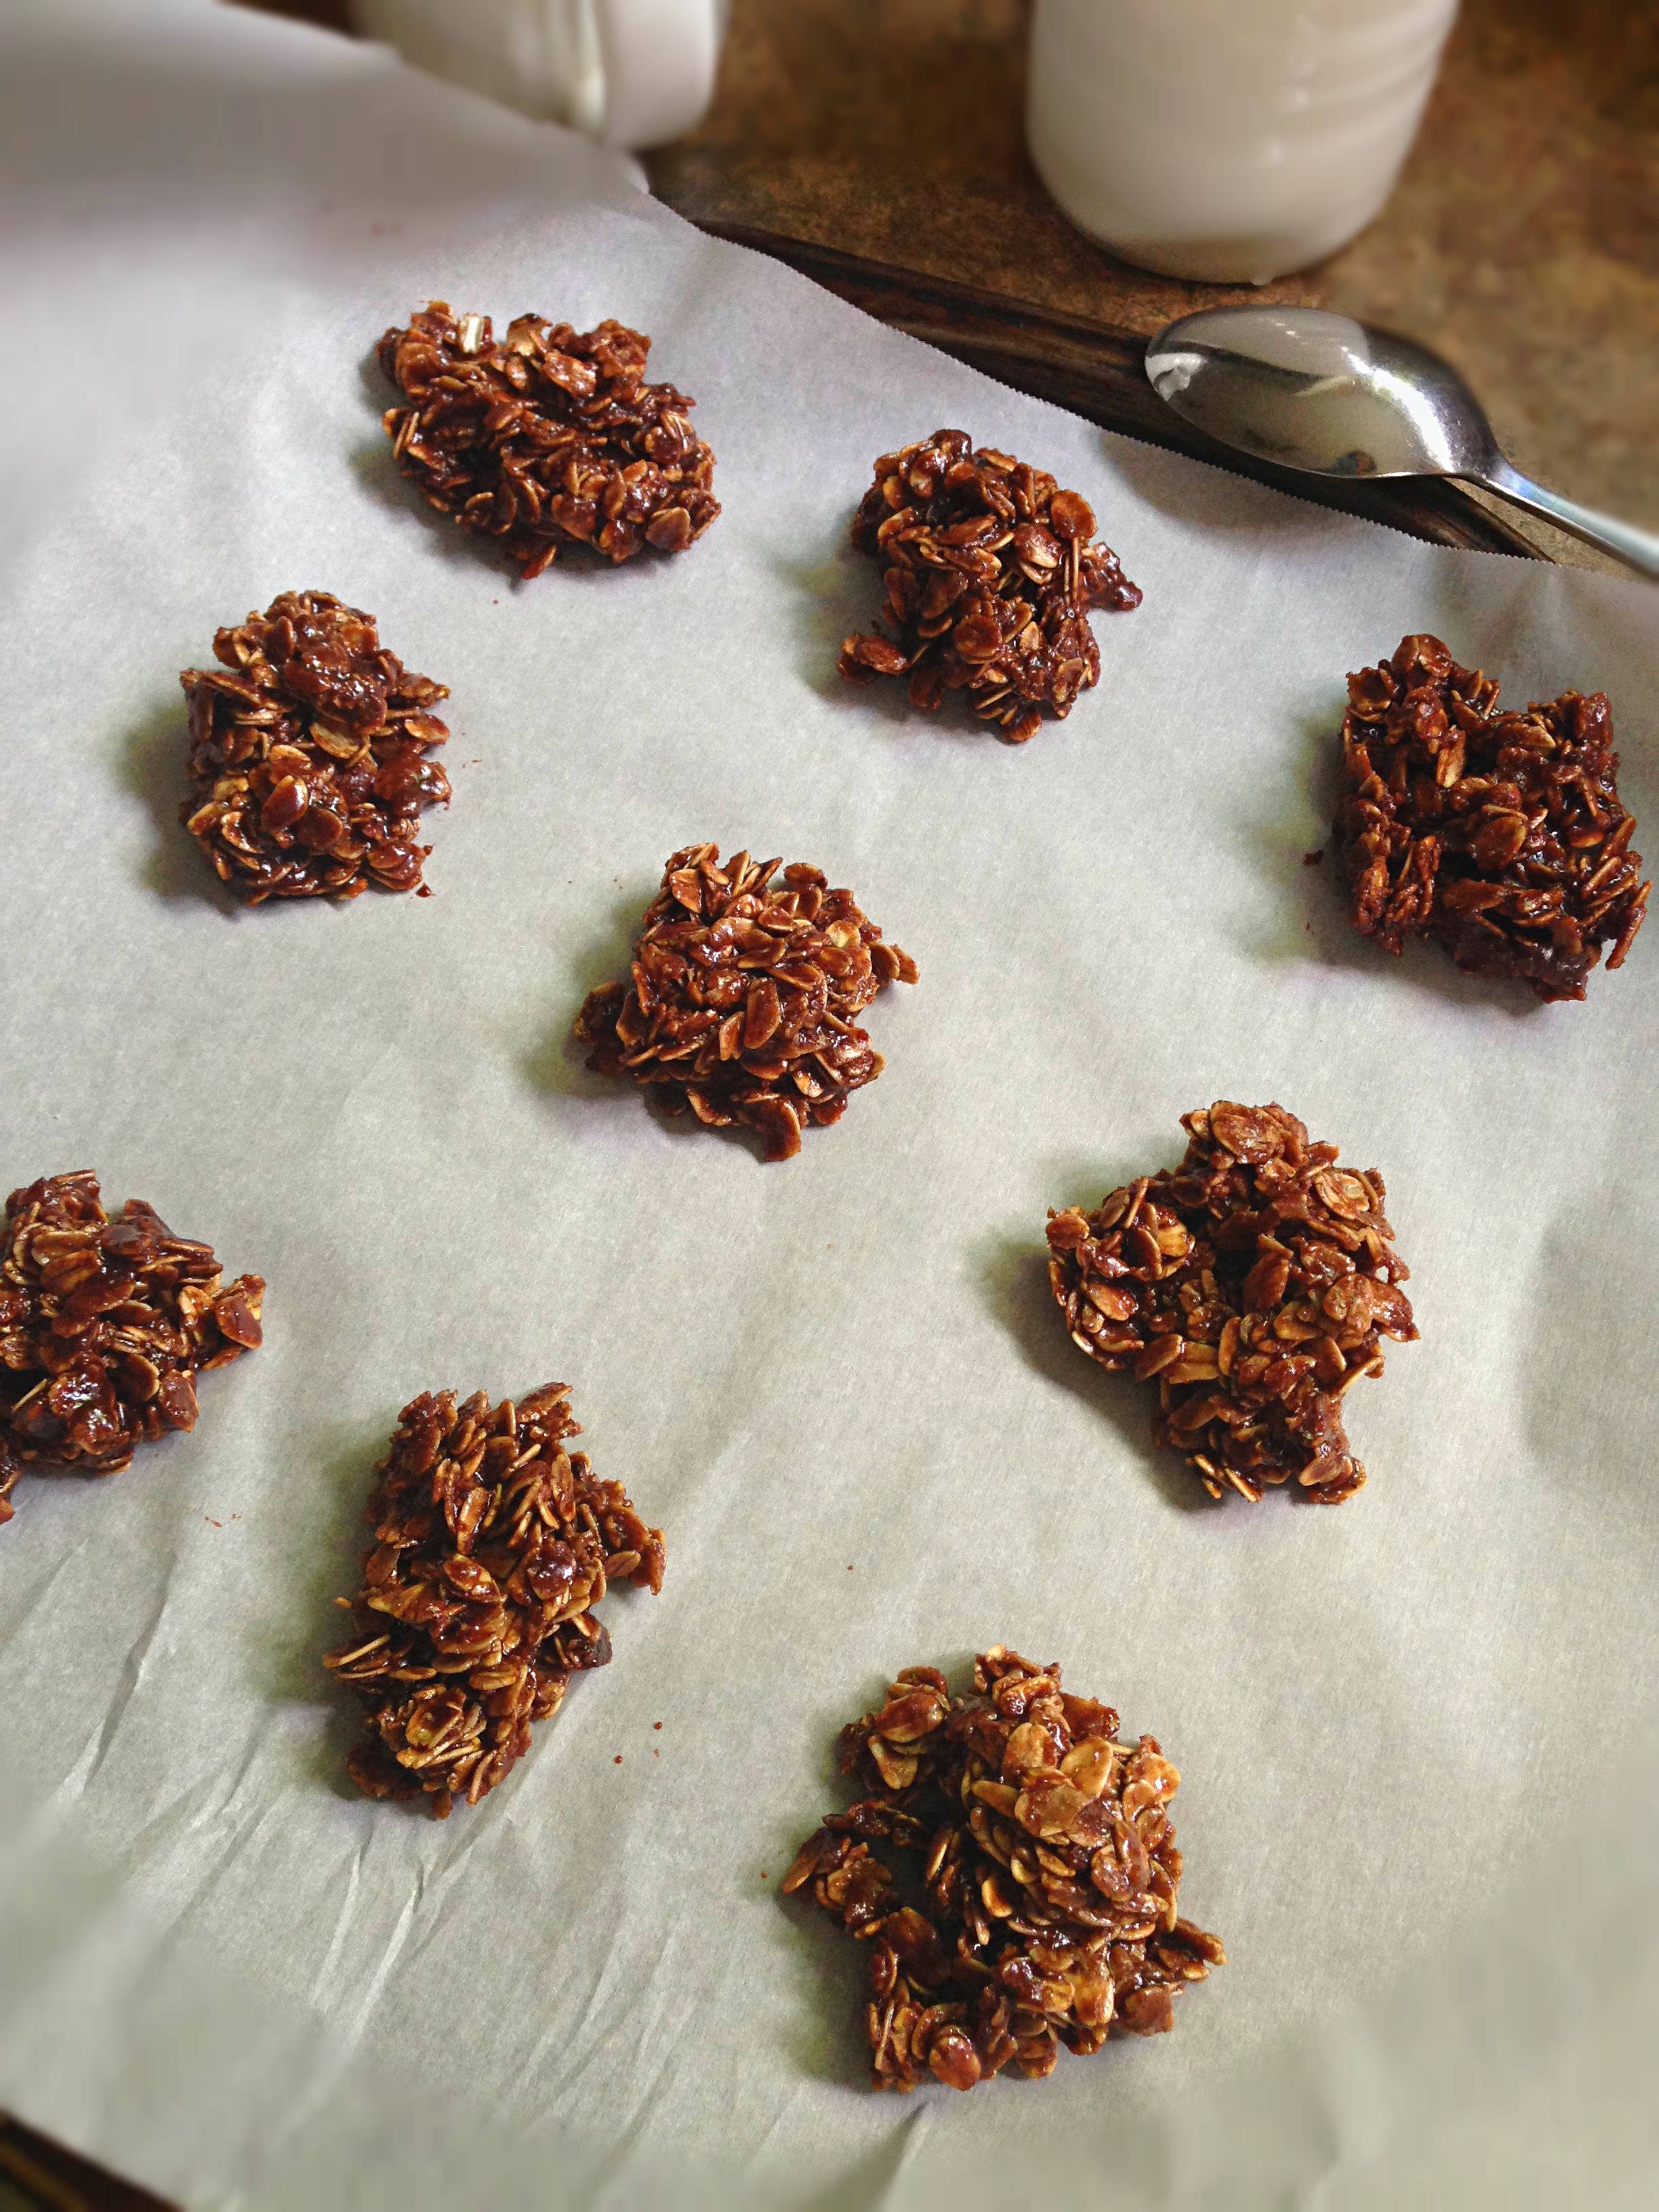
- Make sure to use a non-stick baking sheet or parchment paper on a cookie tray when you refrigerate or freeze these. I like to use silicon baking mats. It makes the cookies come off way easier rather than stick to the tray.
- This isn’t in the recipe card, but you can throw in some vegan chocolate chips or raw cocoa nibs after you mix in the oats and vanilla. Once they’re refrigerated, they’ll add an extra crunch!
More On-The-Go Snackables
Here are some more of my favourite easy to pack snacks. The best thing about energy bites is that they are made with easy to find, whole food ingredients. Not to mention that these simple ingredients are pretty versatile. You can add and subtract whatever you prefer to make the dough stick together!
Chocolate Zucchini Energy Bites: With hidden couscous and zucchini in here, the chocolate-coconut flavour masks the top nutritional value inside. They’re a great way to use up leftover veggies!
Cookie Dough Bites: If you’re a fan of cookie dough, you need to run to this post and make this energy bites. They are like cookie dough but in healthy energy bite form (no peanuts involved)!
Chocolate Pecan Granola: This is not an energy ball, but still a great option for a packable snack. Granola is also a great breakfast option.
Orange Creamsicle Bites: These are reminiscent of the orange creamsicle popsicles I grew up eating. It’s like a sweet and creamy orange juice popsicle on the outer layer with vanilla ice cream inside! These energy balls, although they aren’t made of ice cream, are like a raw vegan version of an orange creamsicle flavour.
No Bake Nature Valley Granola Bars: These are a copycat of the crunchy, crumbly Nature Valley Oats N’ Honey Granola Bars!
Chickpea Chocolate Chip Cookies: Chocolate chip cookies using almond flour and garbanzo bean flour (chickpea flour) for soft gluten-free cookies!
Browned Butter Chocolate Chip Cookies
If you make this recipe, leave a comment and star rating! Don’t forget to tag your photos @peanut_palate on Instagram. Enjoy!

Simple Vegan Cookie Recipe (No Bake)
Equipment
- Stovetop Pan
Ingredients
- ½ cup refined coconut oil
- 2 cups cane sugar
- ⅓ cup dutch-processed cocoa powder
- ½ cup oat milk
- 3 cups rolled oats
- 1 tsp vanilla extract
Instructions
- Mix the sugar, coconut oil, cocoa powder, and milk in a stovetop pan on medium heat.
- Constantly stir with a whisk until it begins to bubble.
- Remove from the heat and stir in the dry oats and vanilla extract.
- Line a cookie tray with a non-stick mat. Scoop 35 cookies using a cookie scoop.
- Set in the refrigerator for a few hours to harden. I recommend around 3-4 hours!
- Alternatively, if you are short on time, try keeping them in the freezer for an hour or two instead.
Notes
- Keep in an airtight container in the refrigerator to store.
- If packing on-the-go in a lunchbox, store with an ice pack or they will start to fall apart.