
Homemade Vegan Butterfinger Candy Bars
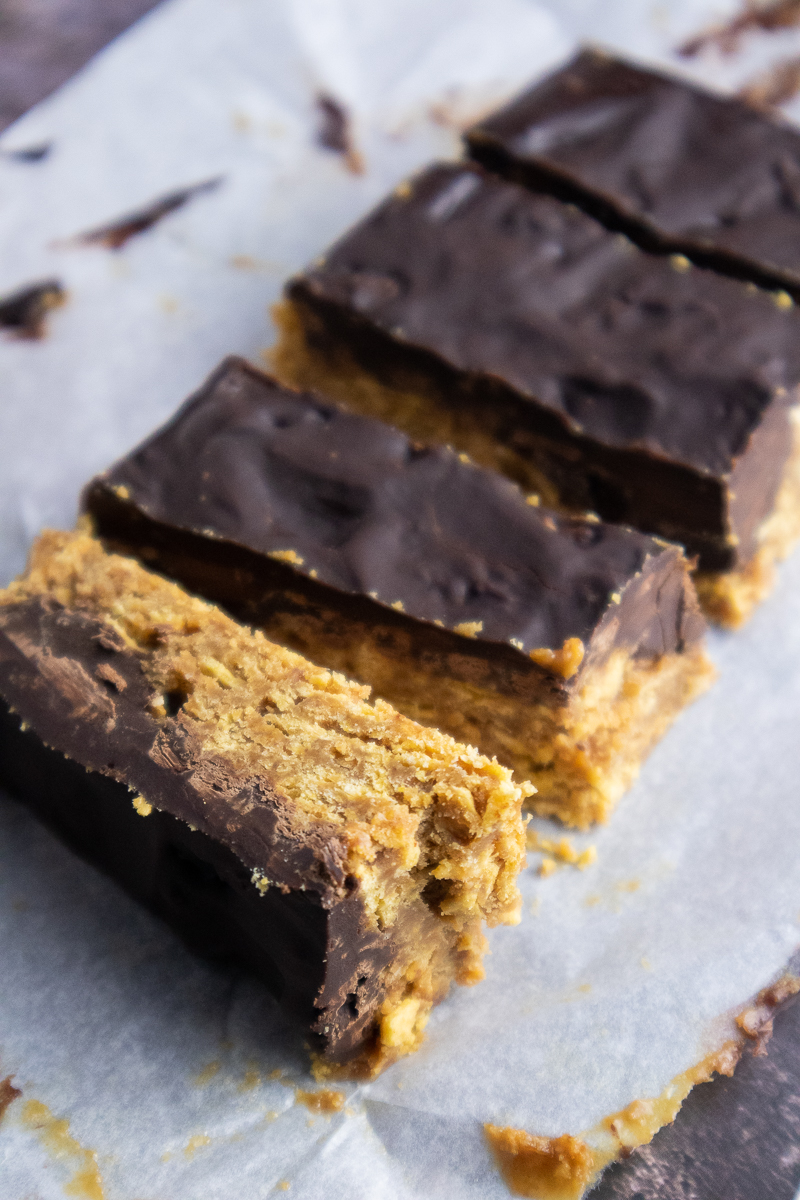
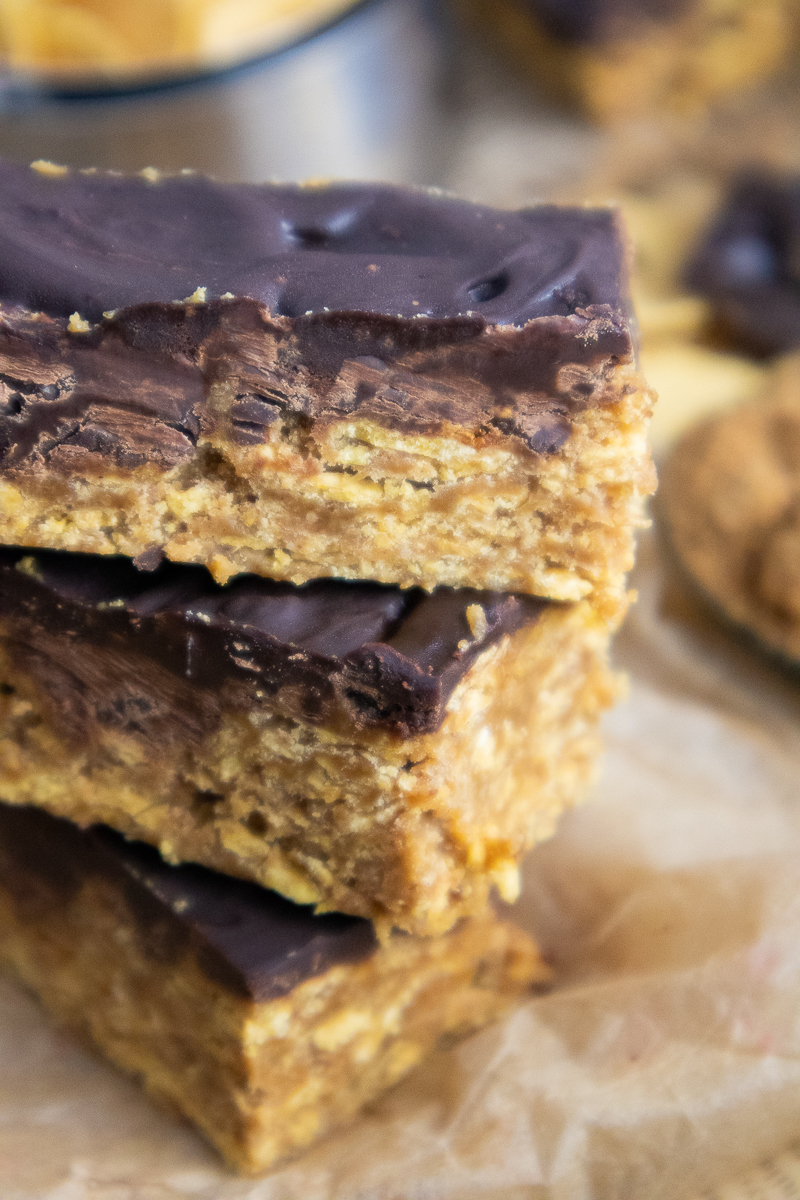
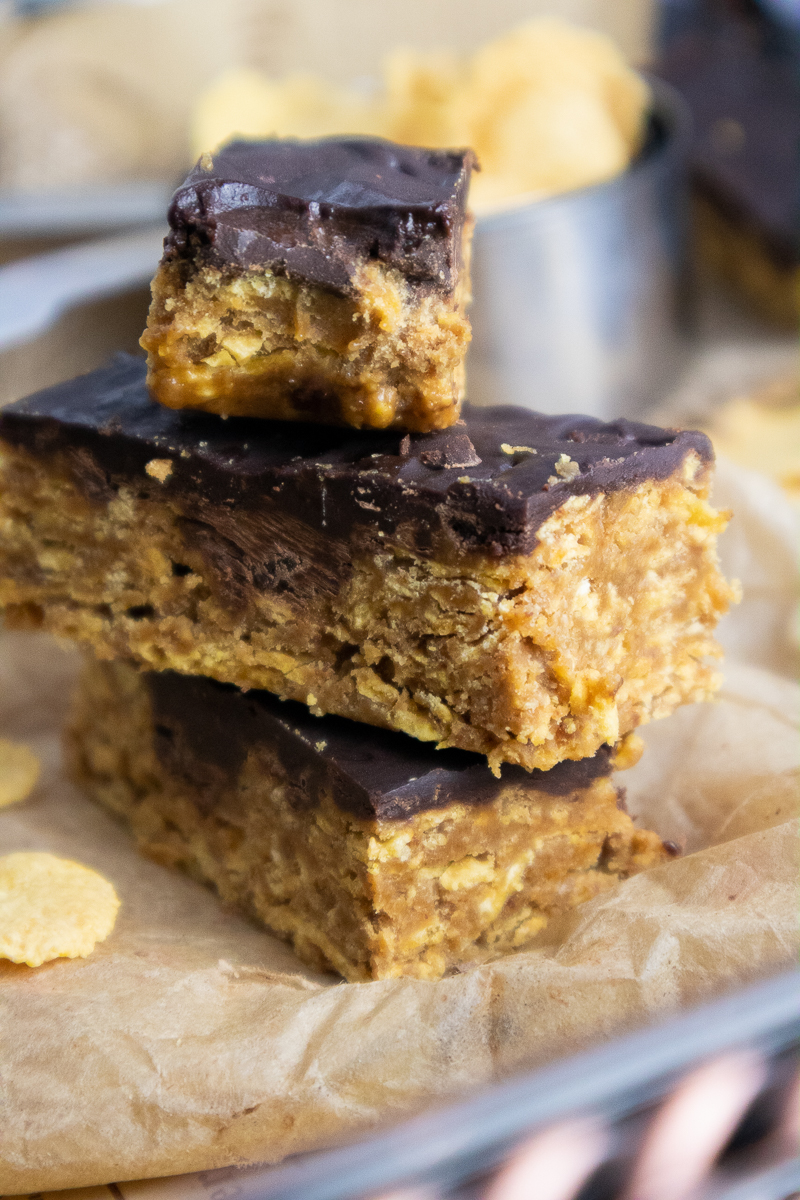
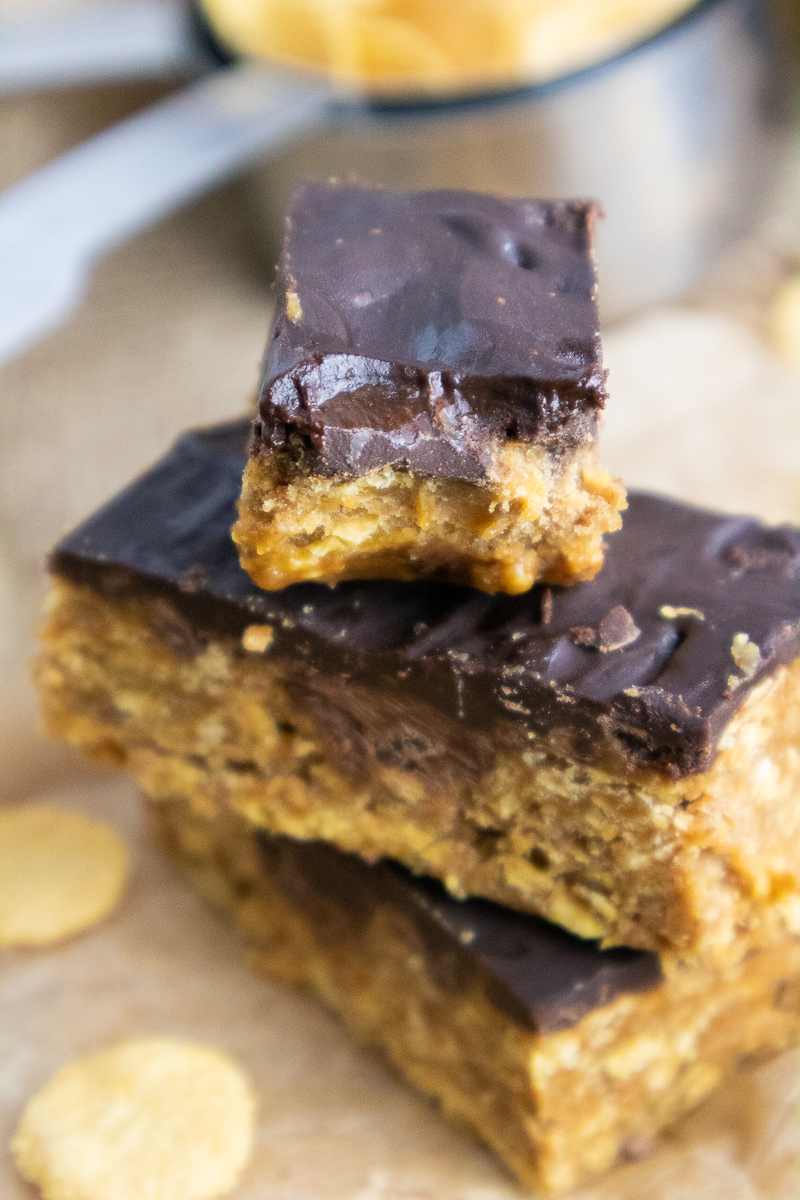
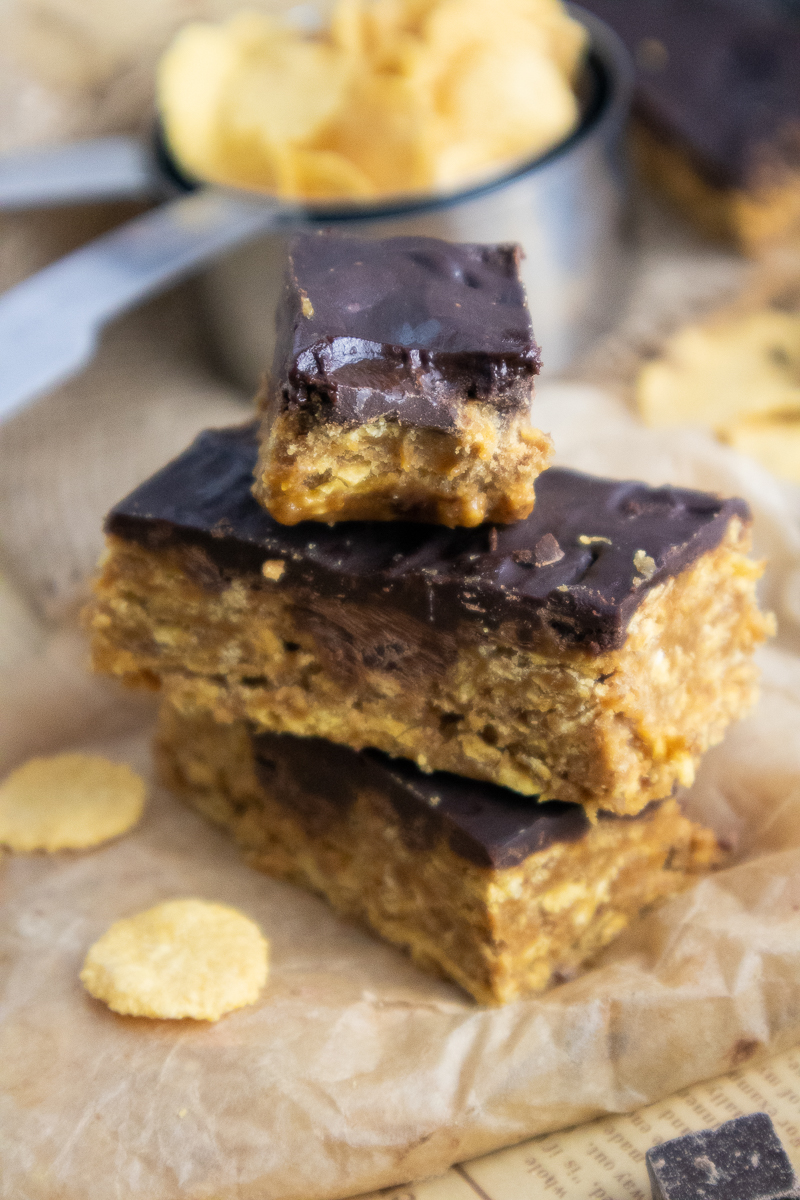
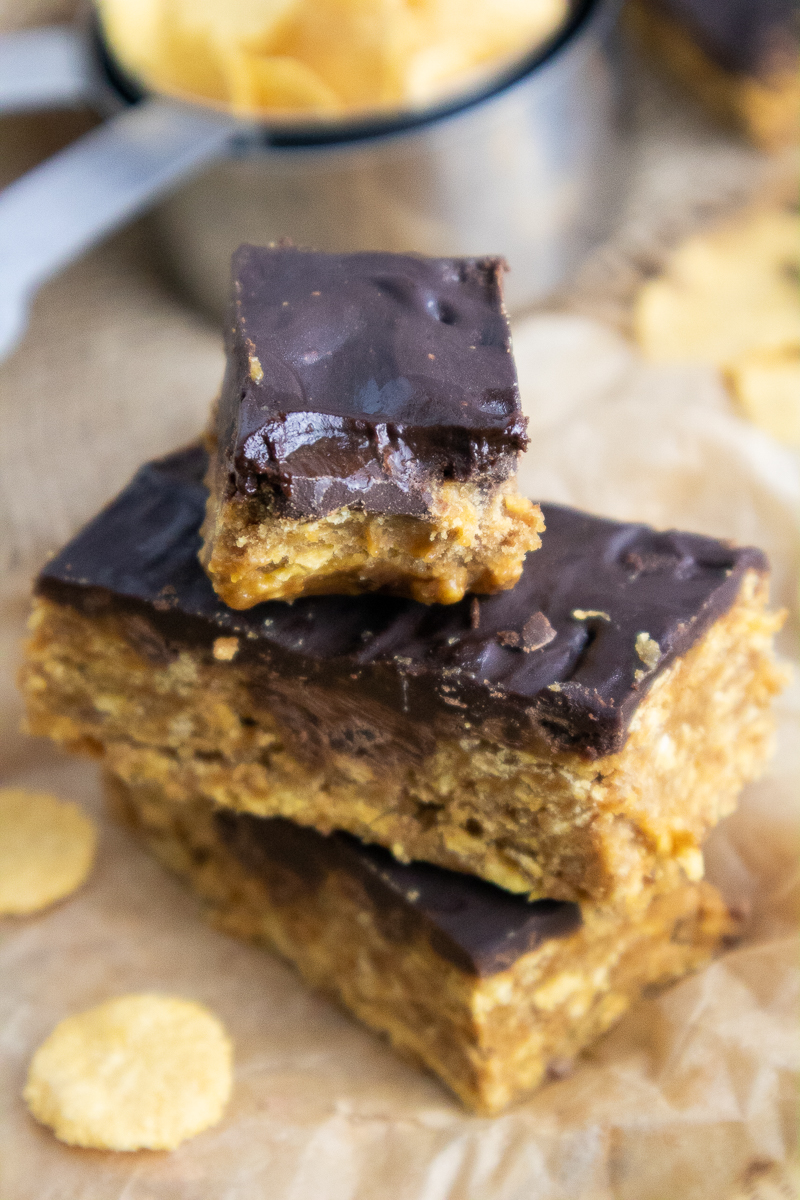
Today we are making Homemade Vegan Butterfinger Candy Bars! These are popular American candy bars that have a crispy, peanut butter flavored center mixed with sweet caramel, all coated in a chocolate topping. It can be eaten straight as a chocolate bar, baked into a cheesecake, mixed into ice cream and more!
The slightly crunchy and crumbly texture and flavors of the inside of the bars give it a distinctively “buttery” taste. They were definitely in my list of favorite candy bars growing up! I remember the first time I had one, and was mind blown at the texture contrast (which is the best part)! The caramel layer adds a chewy and sweet element, while the chocolate coating provides a smooth and indulgent outer layer.
The original candy bar isn’t vegan, and contains a lot of extra sugar and unnecessary ingredients, such as high-fructose corn syrup. So for this recipe, we’re going to make these popular candy bars right at home, with healthier items – and vegan!
At Home Remake
Making homemade candy bars is super satisfying! Some recipes I found actually use leftover candy corn from Halloween, peanut butter and cornflakes to make the real deal, 3-ingredient peanut butter bars that taste like a copycat version of the real Butterfinger – albeit not being the healthiest option.
But these healthy butterfingers (healthier than the original) are easier than making other types of candy at home, and will satisfy your sweet tooth. Melt all the ingredients in a saucepan, stir in the cornflakes, then pour on the melted chocolate topping. No candy thermometer needed!
To make homemade butterfingers, we use corn flakes to give the crunchy texture. Then peanut butter, coconut sugar, molasses and agave syrup form the caramel-like mixture. Coconut oil helps it all to solidify as well as adding to the liquid mixture to make it all stick together. Lastly, the chocolate topping makes for a texture contrast between the crispy inside, with a sweet top and a nutty, salty inside!
Why You’ll Love These Homemade Vegan Butterfinger Candy Bars
Allergy-Friendly: Store-bought candy bars often contain common allergens like dairy, eggs, and gluten. Making homemade versions of your favorite candy bars is a great option to accommodate dietary restrictions and allergies. You have the freedom to choose ingredients that are safe and suitable for those with specific dietary needs.
Customizable Flavors: When you make these homemade vegan Butterfinger candy bars, you have the creative freedom to experiment with different flavors and textures. You can add additional ingredients like pecans, coconut flakes, or even spices like cinnamon or cardamom to enhance the taste according to your preferences.
Substitutions: Dry Ingredients
Cornflakes: Choose plain cornflakes that are vegan, as some are frosted and contain milk ingredients. Check the ingredient label to confirm if it contains any milk products.
Note that Kellogg’s cornflakes aren’t technically vegan. They are fortified with Vitamin D. The vitamin D used here is derived from lanolin, which is sheep’s wool grease. Instead, I recommend to check the natural foods aisle of the grocery store to find a vegan version of plain cornflakes.
For a gluten-free option, choose a brand that does not contain malt syrup or malt extract. These ingredients contain barley gluten. I used the vegan and gluten-free cornflakes from Nature’s Path for this recipe.
Coconut Sugar: Substitute with brown sugar.
Cane Sugar: Use xylitol instead. Xylitol looks almost just like sugar, but it comes from naturally occurring compounds in some plants. It’s commonly used as a “sugar-free” sugar substitute.
Substitutions: Wet Ingredients
Coconut Oil: Use refined coconut oil, that doesn’t smell like coconuts (unlike virgin or extra-virgin). Do not substitute with any other oil (eg. canola oil, olive oil) as it doesn’t harden up the way coconut oil does. Vegan butter may work instead.
Creamy Peanut Butter: Use almond butter, cashew butter or another nut butter of choice. Sunflower seed butter or tahini may work well for those with a nut allergy or as a nut-free option. When choosing any nut or seed butter, make sure there is only one ingredient on the label – just that nut or seed. For example, the only ingredients in peanut butter should be peanuts, and not added oils and sugar.
Agave Nectar: Substitute with pure maple syrup for the most similar taste. Coconut nectar, date syrup, brown rice syrup or other liquid sweeteners may work as well, for a slightly different taste.
If choosing agave nectar, there are different types. For example, there is light, amber, dark, raw and even blue agave. The darker the agave, in name and in color, the stronger the caramel-like taste. You can use light agave nectar here, or choose a darker version for more caramel notes.
On the other hand, blue agave nectar doesn’t give away much about its color. It is made specifically for the tequila industry, and has a slightly smoky aftertaste as compared to other types of agave. For best results, I would go with light agave nectar.
The same goes for maple syrup! The darker the maple syrup, the more robust the maple flavor will be. Choose the liquid sweetener as desired, keeping in mind the difference in taste.
Substitutions: Chocolate Topping
Chocolate: Make sure the chocolate does not contain any milk products. You can use dark chocolate chips or a bar, but semisweet chocolate will be best and not as bitter as its darker substitute.
Milk: Use any plant-based milk of choice, such as soy milk, almond milk or cashew milk.
Using canned coconut milk provides a higher fat option, which will make the topping more like a chocolate ganache. If you prefer that the chocolate top be softer and not crunchy, then go with a canned coconut milk option. I recommend Thai Kitchen, full-fat canned coconut milk.
Homemade Vegan Butterfingers Recipe Notes
- Use a pizza cutter to cut the bars, for easy cutting into perfect rectangles. You can also use a very sharp knife run under boiling hot water before cutting.
- Make sure to leave extra wax paper over the sides of the pan for easy lifting once the bars are ready to cut.
More Dessert Recipes You’ll Love
Chocolate Chip Tahini Cookie Dough Bars
If you make these Homemade Vegan Butterfinger Candy Bars, then leave a comment and star rating! Don’t forget to tag your photos @peanut_palate on Instagram. Enjoy!

Homemade Vegan Butterfinger Candy Bars
Equipment
- Rubber Spatula
- Medium Saucepan
- Pizza Cutter optional
Ingredients
For the Butterfingers
- ½ cup coconut sugar
- ½ cup refined coconut oil
- 1 tsp vanilla extract
- ½ tsp pink salt
- 1 tsp blackstrap molasses
- ½ cup cane sugar
- 1 cup natural, creamy peanut butter
- ½ cup agave syrup
- 2⅓ cups plain, unfrosted vegan cornflakes
For the Topping
- ½ cup oat milk
- 2 cups vegan semisweet chocolate chips
Instructions
- Mix all ingredients with a rubber spatula, except the vanilla and cereal, in a saucepan over low heat until softened.
- Remove warm peanut butter mixture from the heat. Stir in the vanilla extract and the cereal, until all ingredients are evenly distributed.
- Line a baking pan with wax paper, leaving extra paper hanging off the sides for easy lifting later on. Pour the mixture into the tray, patting down medium-thick. Set aside.
- Next, clean the saucepan and place the chocolate topping ingredients in it.
- Use a rubber spatula to stir the chocolate topping ingredients over low-medium heat, until fully melted. Alternatively, you can use a double boiler to melt chocolate, or place the chocolate in a heat safe bowl, microwaving it in 20 second intervals and stirring, until melted.
- Pour the chocolate topping over the bars, spreading it into an even layer.
- Place the bars in the freezer for a half hour.
- Once frozen, use a pizza cutter to cut 16 bars. Enjoy!
Notes
-
Storage
- Store in an airtight container in the refrigerator for up to three days.